
Master how to make rajma at home and bring the authentic taste of North India to your kitchen. This Punjabi style rajma recipe creates a hearty, nutritious, and full-of-flavor dish that pairs great with basmati rice for the classic rajma chawal experience that has been comfort food for generations.

Talk about a classic recipe! A regular, on the weekly menu, Sunday special, and passed down over generations kind of recipe. Think of this Punjabi style rajma recipe as a hearty stew that is satisfying and completely comforting.
Rajma Chawal is a beloved North Indian comfort food that combines red kidney bean curry (rajma masala) with rice (chawal). Cooking rajma is a labor of love; the result is absolute bliss! Eat rajma by the bowlfuls, serve it with some plain rice, jeera rice, or enjoy it with fresh homemade roti or homemade naan. You will not be disappointed.
Just like several other Indian curries like the garlic mushroom stir fry, stuffed bell peppers, and mixed lentil dal, this rajma recipe is vegan and gluten free. I, however, highly recommend a spoonful of ghee drizzled over your bowl of rajma chawal.
Jump to:
🫘What is Rajma Chawal?
Rajma Chawal is a beloved North Indian comfort food that combines red kidney beans curry (rajma) with plain or jeera rice (chawal). This Punjabi style rajma recipe is rich, flavorful, and packed with plant-based protein. The creamy texture of the beans combined with aromatic spices creates a dish that's both nutritious and satisfying. Whether you're a seasoned chef or a beginner wondering how to make rajma, this authentic recipe will guide you through creating this classic Indian dish.
✨What you'll love about this recipe?
- Authentic Flavors: This Punjabi style rajma recipe uses traditional methods and spices for genuine taste.
- Perfect Texture: Learn the secret to getting buttery-soft beans with a light yet flavorful broth.
- Balanced Spices: The perfect blend of spices creates a home-style red kidney beans curry without being overwhelming.
- Versatile Dish: Enjoy it with plain rice or jeera rice as classic rajma chawal or with homemade naan, whole wheat roti, or even as a soup.
📋Recipe Ingredients

For Cooking the Red Kidney Beans
- Red kidney beans - use dried red kidney beans that have been soaked overnight or 6-8 hours.
- Salt and Water - Add enough water so that there is at least an inch or two of water covering the beans and add salt to taste.
For the Masala
- Oil - I use avocado oil in this recipe, but any type of oil will work. You can also use ghee to make the masala if not tied to a vegan diet.
- Spices - all my favorite and the very basic spices in my masala dabba - cumin seeds (oops, not pictured), turmeric, coriander powder, and garam masala.
- Aromatics - onion (you can use red or white onion), ginger, garlic (or use ginger garlic paste), tomato, cilantro, and green chili (optional). These aromatic vegetables will form the base of the flavor profile along with the spices.
- Fresh Cilantro - or coriander (aka as dhania/dhaniya) is an absolute must for this recipe. But if it tastes like soap to you, simply skip it.
Don't forget to check out the recipe card below for a complete list of ingredients along with the quantities.
📖Substitutions, Additions and Variations
This recipe is naturally gluten-free and vegan. Here are some possible suggestions to adapt it to your liking
- Canned Beans - to save time, you can use canned beans. Skip the pressure cooking part and add the rinsed and drained canned beans to the cooked masala along with water and salt.
- Ginger Garlic Paste - use 2 teaspoon ginger garlic paste instead of fresh ginger and garlic and add it to the pan along with the blended onion tomato paste.
- Green Chili - I have used serrano pepper in this recipe, but it's optional. You can use jalapenos or Thai chili peppers, depending on the desired heat level in this recipe.
- Make in Instant pot - I use a pressure cooker in this recipe. But you can skip soaking and increase pressure cooking time to 45-50 minutes for a quicker Instant Pot version. Or cook the soaked beans with same pressure cooking times as given in the recipe card below.
- Tomato Puree - you can use good quality, store bought pureed tomatoes instead of fresh tomatoes in this recipe. Just add the puree to the saute pan after you add the blended paste of onion, ginger and garlic.
- Forgot to soak? - add boiling hot water to dried beans and let them soak in a warm place for just 30 minutes.
👩🍳Steps to make this recipe
Plan ahead: Soak the red kidney beans in enough water for 6-8 hours or overnight.
Step 1: Drain the water in which the beans were soaked and give them a quick rinse. Set a pressure cooker on high heat and add the soaked rajma, 4-5 cups of water, and salt. Close and lock the lid of the pressure cooker and wait for it to whistle (or come to full pressure). This will take 10-12 minutes depending on the size of your pressure cooker.
Once the cooker "whistles", lower the heat to low and set a timer of 30 minutes.
Step 2: In a blender jar, add peeled ginger, garlic cloves, green chili (if using), onion (cut into big chunks), and tomatoes (cut into big chunks).


Step 3: Blend until everything is crushed and smooth.
Step 4: When 15 minutes remain on your rajma cooking time (in the pressure cooker), heat oil (or ghee) in a large non stick or heavy bottomed pan over medium high heat. Add cumin seeds and let them crackle. Now, add the blended paste along with turmeric and coriander powders.


Step 5: Mix everything until combined.
Step 6: With the heat on medium-high cook/bhoono (read all about the technique of bhoono in this recipe of coriander chicken) the masala until all the moisture evaporates and tiny droplets of oil start to appear at the edges (Image 6). This will take between 10-15 minutes. Keep stirring in between. This is your masala.


Step 7: By now your rajma should be cooked. Wait for the pressure of the cooker to release naturally and open the lid. The red kidney beans should be easily mashed when pressed.
Step 8: Add the prepared masala (step 6) to the cooked rajma. Turn the heat on to medium high, bring to a boil, and lower the heat. Check and adjust the salt if needed.


Step 9: Let the rajma masala simmer for 5-10 minutes on low heat, stirring occasionally. Add garam masala and chopped cilantro and adjust consistency according to preference.
Step 10: Serve hot with basmati rice for classic punjabi style rajma chawal. Pickled red onions are highly recommended as a side!


💡Vaishali's tips
- Buying red kidney beans - try to buy your dried beans from stores that keep their stockpiles fresh. Old beans are hard to cook with and do not have the same texture and taste as fresher dried beans.
- Soaking beans and lentils - help with reducing the cooking time and also with making them more easily digestible. Soaking also helps with a more uniform and creamy texture as compared to canned beans.
- Cooking time - this recipe gives times for cooking 1 cup dried red kidney beans in a 3-litre volume pressure cooker. The time to develop and release pressure will depend on the size of the pressure cooker as well as the quantity of the beans cooked.
- Bhoono Masala - Bhoonoing or cooking the masala of the aromatics and spices to a point where all the moisture has evaporated and the fat separates (tiny droplets of oil along the edges of the masala) is the key to developing flavors. Please do not rush this step and follow the pictures given in step by step procedure.
- The masala will eventually leave the side of the pan and come together. If the masala begins to stick to the bottom of your pan, add few drops of water to release those flavorful bits of masala stuck to the bottom of the pan. The color of the masala would deepen as you bhoono.
- While cooking, the masala will splutter a lot. So make sure you use a wooden spatula with a long handle and be very careful.
🍲Open Pot Cooking Instructions
If you do not have a pressure cooker, you can cook Punjabi style rajma in an open pan. Set the soaked beans to boil with water and salt in a Dutch oven. Once boiling, reduce the heat to low so that the beans are gently simmering. Cover and cook for at least an hour.
After that, check for consistency and doneness. You might have to add more water. At this point, add the bhoonoed masala and cook for another 30 minutes to an hour or until the beans can be mashed between your thumb and finger by gently pressing on it. Finish with garam masala and cilantro.
🍴Serving suggestion

Eat rajma by the bowlfuls, serve it with some plain rice, jeera rice, or enjoy it with fresh homemade roti or homemade naan.
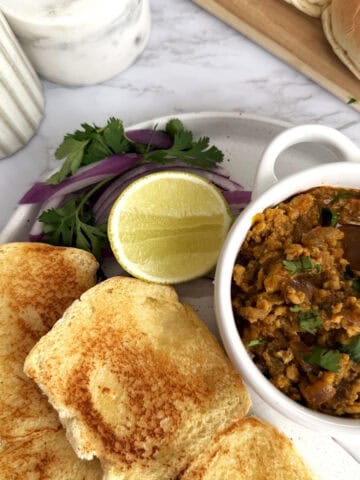
A simple salad of sliced cucumbers and tomatoes is commonly served with rajma chawal. Pickled red onions, chopped or slit green chilis and lime wedges are how we serve this punjabi style rajma in my house along with a small bowl of homemade yogurt.
A drizzle of ghee elevates a bowl of rajma to a whole new level. You can also add a spoonful of mint cilantro chutney for added zing.
A perfect dinner menu could serve this rajma with chawal (jeera rice) and my five-star recipe of meethi sewiyan (sweet vermicelli) or Indian Bread Pudding for dessert.
💡Meal Prep Ideas
- Cook the rajma and masala separately - ahead of time and store in an airtight container in the refrigerator (for upto 4 days). When ready to eat, mix everything together.

🫙Storage and Freezing Instructions
- Store: This rajma curry can be stored in an airtight container in the fridge for up to 4 days.
- Freeze: Rajma freeze very well so make a double batch and freeze one. Once completely cooled, put in air-tight containers or freezer bags, label and freeze for 3-4 months. When ready to eat, thaw and reheat in a saucepan.
❓FAQs
Yes, you can use canned kidney beans to save time. Drain and rinse them well before adding to the masala. You'll need approximately 4-5 cups of canned beans for this recipe. Skip the soaking and pressure cooking steps.
Old beans take longer to cook. Always check the expiry date when buying dried beans.
While rajma chawal is classic, you can also serve this red kidney beans curry with naan, roti, paratha, or even as a filling for wraps and burritos.
Related
Looking for other recipes like this? Try these:

If you make this recipe be sure to leave a comment and let me know how you liked it! Share it on Instagram with the hashtag #thekitchendocs or share on Facebook, too.
Love – Vaishali

Punjabi Style Rajma
Equipment
Ingredients
- 1 cup rajma or red kidney beans dried beans
- 1 inch piece of ginger peeled
- 3-4 cloves garlic peeled
- 1 small red onion peeled and cubed
- 2 big tomatoes on the vine or other juicy tomatoes, roughly chopped
- ½ serrano pepper optional
- 2 tablespoon oil or use ghee
- 1 teaspoon cumin seeds
- ½ teaspoon turmeric powder
- 2 teaspoon coriander powder
- 1 teaspoon garam masala
- Salt to taste
- 5-6 sprigs cilantro leaves stripped and chopped, for garnish
Instructions
- Plan ahead: Soak the red kidney beans in enough water for 6-8 hours or overnight.
- Drain the water in which the beans were soaked and give them a quick rinse. Set a pressure cooker on high heat and add the soaked rajma, 4-5 cups of water, and salt. Close and lock the lid of the pressure cooker and wait for it to whistle (or come to full pressure). This will take 10-12 minutes depending on the size of your pressure cooker. Once the cooker "whistles", lower the heat to low and set a timer of 30 minutes.
- In a blender jar, add peeled ginger, garlic cloves, green chili (if using), onion (cut into big chunks), and tomatoes (cut into big chunks). Blend until everything is crushed and smooth.
- When 15 minutes remain on your rajma cooking time (in the pressure cooker), heat oil (or ghee) in a large non stick or heavy bottomed pan over medium high heat. Add cumin seeds and let them crackle. Now, add the blended paste along with turmeric and coriander powders. Give everything a mix. Note: This masala will splutter a lot, so I recommend using a wooden spatula with a long handle and being very careful.
- With the heat on medium-high cook/bhoono (read all about the technique of bhoono in this recipe of coriander chicken) the masala until all the moisture evaporates and tiny droplets of oil start to appear at the edges. This will take between 10-15 minutes. Keep stirring in between. This is your masala.
- By now your rajma should be cooked. Wait for the pressure of the cooker to release naturally and open the lid. The red kidney beans should be easily mashed when pressed.
- Add the prepared masala (step 6) to the cooked rajma. Turn the heat on to medium high, bring to a boil, and lower the heat. Check and adjust the salt if needed.
- Let the rajma masala simmer for 5-10 minutes on low heat, stirring occasionally. Add garam masala and chopped cilantro and adjust consistency according to preference.
- Serve hot with basmati rice for classic punjabi style rajma chawal. Pickled red onions are highly recommended as a side!
Notes
- Buying red kidney beans - try to buy your dried beans from stores that keep their stockpiles fresh. Old beans are hard to cook with and do not have the same texture and taste as fresher dried beans.
- Soaking beans and lentils - help with reducing the cooking time and also with making them more easily digestible. Soaking also helps with a more uniform and creamy texture as compared to canned beans.
- Cooking time - this recipe gives times for cooking 1 cup dried red kidney beans in a 3-litre volume pressure cooker. The time to develop and release pressure will depend on the size of the pressure cooker as well as the quantity of the beans cooked.
- Bhoono Masala - Bhoonoing or cooking the masala of the aromatics and spices to a point where all the moisture has evaporated and the fat separates (tiny droplets of oil along the edges of the masala) is the key to developing flavors. Please do not rush this step and follow the pictures given in step by step procedure.
- The masala will eventually leave the side of the pan and come together. If the masala begins to stick to the bottom of your pan, add few drops of water to release those flavorful bits of masala stuck to the bottom of the pan. The color of the masala would deepen as you bhoono.
- Canned Beans - to save time, you can use canned beans. Skip the pressure cooking part and add the rinsed and drained canned beans to the cooked masala along with water and salt.
- Ginger Garlic Paste - use 2 teaspoon ginger garlic paste instead of fresh ginger and garlic and add it to the pan along with the blended onion tomato paste.
- Green Chili - I have used serrano pepper in this recipe, but it's optional. You can use jalapenos or Thai chili peppers, depending on the desired heat level in this recipe.
- Make in Instant pot - I use a pressure cooker in this recipe. But you can skip soaking and increase pressure cooking time to 45-50 minutes for a quicker Instant Pot version. Or cook the soaked beans with same pressure cooking times as given in the recipe card below.
- Tomato Puree - you can use good quality, store bought pureed tomatoes instead of fresh tomatoes in this recipe. Just add the puree to the saute pan after you add the blended paste of onion, ginger and garlic.
- Forgot to soak? - add boiling hot water to dried beans and let them soak in a warm place for just 30 minutes.


Leave a Reply